Who Says You Need a TV Service Provider to have a DVR?

Standard

Back in February, I wrote a multi-part blog series on cutting the cable television cord. In that series, Step 3 was Setting up an Optional Digital Video Recorder (DVR) for over the air (OTA) programming. In July, I did this myself. Now it’s September and I’ve had a couple of months to get accustomed to this new TV paradigm. I’d like to share my experiences with you.

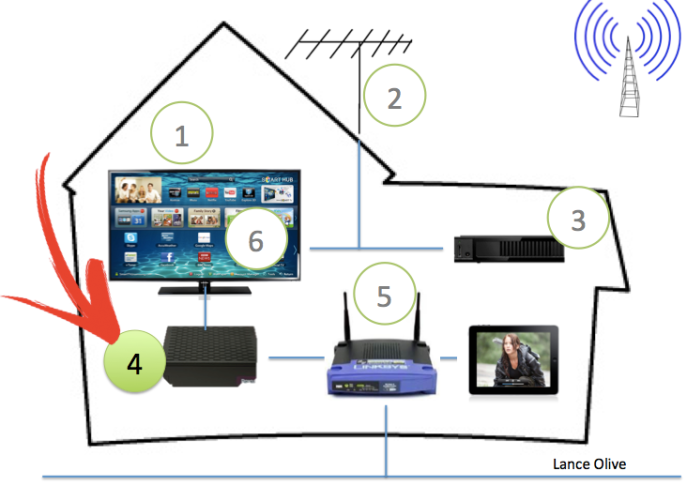
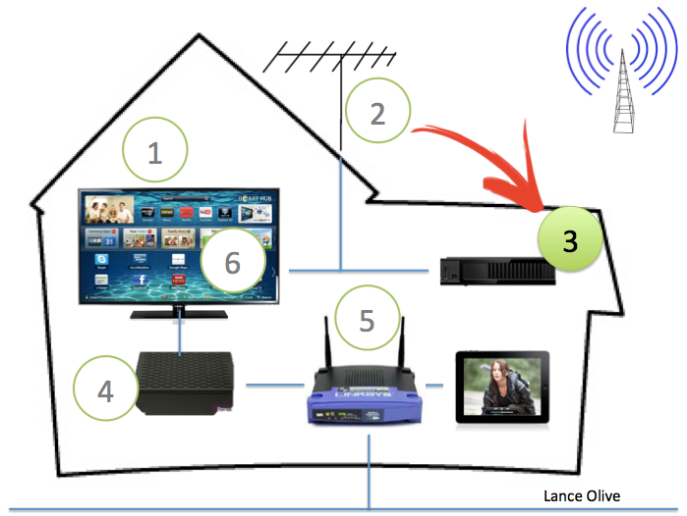
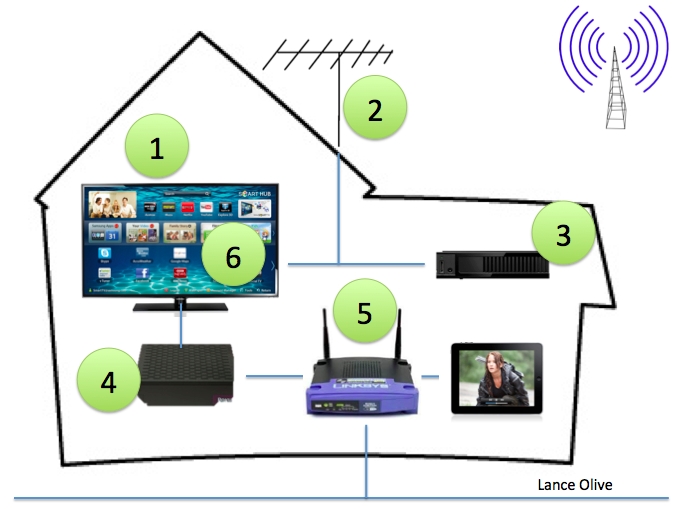
First, I bought the TabloTV 4-Tuner whole-house DVR from Nuvyyo (Kanata, Ontario). I’ve discovered that the concept of “whole house DVR” takes my friends and family two or three times of hearing it before they finally get it. The easiest way to explain it is this: the box sits next to the router and has the antenna connected directly to it. I can watch it anywhere I can get on the WiFi, with my iPad or Android tablet.

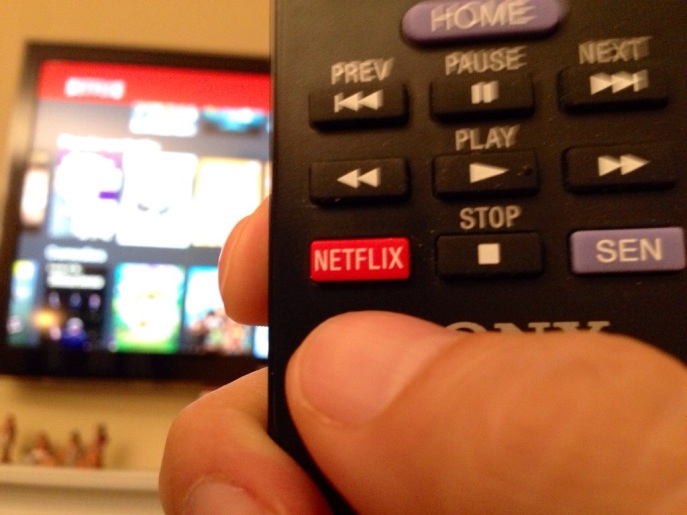
Second, I began wanting to view the content on my large TV so I bought a Roku 1 and downloaded the Tablo app onto it. When I launched it, it automatically found my Tablo, being on the same subnet in the house. The Graphical User Interface (GUI) felt natural for the Roku, but was different from the iPad app. It didn’t take me long at all to find some shows that I had already recorded. Watching them was a breeze.

In the mornings, I tend to watch live TV, such as news and weather, but in the evenings I only watch recordings from earlier. I use my Roku almost exclusively to watch the content because I like the large picture and full sound. If you have a new AppleTV, you can use Airplay to watch the content from your iPad. Google’s Chromecast is supposed to work, too, but I don’t have any experience with it.

Even though I love having it, and saving the $100+ a month from having dropped cable TV, I still found the software lacking, albeit serviceable. The mental list got so long, I captured it on the TabloTV community forum thread here. I really would like to see a full 9-12 months of feature and functionality improvements on their GUI before they begin to call it stable.

But I have no regrets with my choice and, for the money I’m saving, I have been able to adapt and overcome the withdrawals of having 200 channels and a DVR. Now I have TabloTV plus Roku with Netflix, Amazon Prime, WatchESPN, Hulu+, A&E, History, NFL Now and Qello to keep me entertained.

If you decide to go this route, do yourself a favor and bump up to the 4-tuner model, rather than skimp on the 2-tuner. You’ll be resolving conflicts left and right if you don’t. But you certainly don’t need to pay ridiculous prices to have television piped into your home and a DVR. Go antenna plus Tablo and save big.

TabloTV works, but the UI needs help

TabloTV
Standard


In June I installed my 4-tuner TabloTV box and set it off recording several shows from over-the-air (antenna) transmissions. This past week I finally got a Roku 1 and installed the TabloTV app (a.k.a. “channel”) and used it for a day before putting together this fairly lengthy list of suggestions for their User Interface, which needs some work.

http://community.tablotv.com/discussion/comment/5236/#Comment_5236

In no particular order…

Delete All. When browsing the recordings, select a set “e.g. Monk” and delete all the recordings at one time.

Simpler Delete. When I’m on a single recording (on Roku), it takes 6 button presses to delete it. Give me a setting to disable Delete Confirmation — I’m willing to risk the accidental delete.

Automatic Bookmark. While I’m watching a show, set bookmarks automatically so when I stop and come back (even from another device), I can Resume watching from where I left off, or Restart the show.

FF/RW Preview. Give me thumbnails while fast forwarding or rewinding so I know where I’m at.

Sort By Space Used. When viewing recordings, all me to sort by size, or space used on the HD. When I need to free up disk quickly, I’d like to go find the set that I can blow away to make more space.

Sort By Watched. Create three sort groups: Watched, In Progress (or Watching), New (or Not Watched).

Number Circles. Use numbers in circles to indicate how many recordings (or potential shows) are in each title. Model after iPhone apps.

Recording Timestamp. Show date and time with a recording. The Roku app shows every show as being 29 minutes long, e.g. RallyCross Daytona; Channel 17-1 at 2:30 pm – 2:59 pm. This was a 1hr 5m race. And there is no date.

Search. Find “McQueen”. Find “Eastwood”. Find “Ron Howard”. Find “Carolina Panthers”. This is a “search” generation. Organization is for old people.

Watched Icon. Show me that I’ve already watched something and didn’t delete it.

Extended Start/Stop. Give us the option of putting some time before or after shows.

Next Show: When looking at the options for a single episode, provide a Next button to go to the next show in the set. This can help during binge watching to prevent having to go back, over, select, play.

Stars: These are currently a mystery. All I ever see is gray stars on a show. I can’t set them and I don’t know what they mean.

Eliminate Placeholder Icons. Many shows have no photo icon so you put a placeholder that looks lame. At least make an effort. For example, a movie on TV was “Wild West”, starring Naveen Andrews. How about a getting a photo of him, since he’s listed first in the actor credits? Or “Carolina Outdoor Journal”, even though it has no description, it says the Genre is “Outdoors/Nature”. How about a picture of trees? You get the idea.

Actually Read More. If I click “Read More”, I should see as much as possible, but some info is not put on the More screen, such as Runtime, Director, Genre, Copyright Year, and Major Actor List. More should be more, not less.

Thinner Banner. On Roku, the Tablo banner uses up 15% of the screen space. Slim it down to about half that and use your space more effectively.

Put Actors/Directors in Menu. When I select a show, I see Play, Read More and Delete menu options. I also can read actors names and the director. Why not make those part of the menu and use them as Search when clicked. Example: I just watched a David Attwood directed movie and liked it. Let me click his name on that menu.

Relocate the Recording Date/Time. Don’t put it in the top banner where I’m trained to ignore. Put it down below with the Genre.

Sports Icons. All the sports shows have film icons. Cant you at least make icons for each sport? Baseball, Football, Tennis, Golf, Auto Racing, Bicycle Racing, etc.

Record Now. If I find something on live TV that I like, but don’t have time to watch, allow me to start recording from this screen. Perhaps the * menu on the Roku. Use the already buffered video as the start point.

Remember Close Caption. It seems that closed caption is always off and I must turn it on for every show.

Scheduled Airings Need Timestamp/Sorting. When I look at the scheduled items for Today, Tomorrow, Next Week, I can’t tell when they will get recorded. Needs to be in the cartoon balloon on Roku. On iPad, they need to be grouped and sorted.

Tighten Up Live TV List. On Roku, I have tons of white space and would to do more reading and less scrolling. Tighten it up and use all of the space, perhaps showing the next few half hours.

Limit Recordings per Show. For nightly news, I only ever want the latest 1. If I miss a few, delete the older ones. Let us pick a limit, such as 1,2,4,8,ALL.

Give Channel Info and Start Time. For shows upcoming, there is no channel or time info provided. I know you may think “who cares”, but we still do. Sometimes we need to tell someone else “It’ll be on channel 5.” But without it, Tablo makes us look stupid. “I don’t know what channel… but it’s coming on sometime today.”

Conflict Resolution on Roku. When a conflict is created, there is no immediate notice given. Even when there is, there seems to be no way to resolve it through the Roku interface.

Resume Record. If the Tablo is restarted while a show is recording, the recordings are not resumed after the restart finishes. Preference would be to append to the previous partial recording so there is not two separate recordings.

Previous Channel in Asterisk (*) Menu (Roku). While watching a show live, provide a way to jump to the Prev channel. And/or the other tuners, if active.

Performance. Watching a show that is recording creates blocky pixelation and/or buffering.


Day 1 Without Cable TV

Standard

Morning routine was a little out of whack. Couldn’t watch TheFive on the DVR while eating breakfast. Kind of missing Greg Gutfeld, Dana Perino and Andrea Tanteros. [Note to self, follow their Twitter feed.]

Instead, chose to watch local morning news and weather. The anchors have changes in the last six years. Flipped from channel 5 to 11 to 17. Seems like petty news to me – store burned, car flipped, dog saves cat’s life…. Not sure I’ll find my “fix” with local news.

This evening, I found solace in Netflix. I’m one if the few who never started watching the US version if The Office (Ricky Gervais started it in the UK). So I got 3 episodes in tonight. Funny, yet painful – too close to what I’ve seen before, in many respects.

Didn’t start missing ESPN yet, though — and I was expecting to. But there will come a time when I want cable sports and I’ll have to divert interest.

Saved about $5 today alone. Cha-Ching.

20140718-222240-80560545.jpg

Is Amazon Fire TV Worth It?

Standard
Amazon Enters Streaming Product Fray with Fire TV

Amazon Enters Streaming Product Fray with Fire TV

And then there were four.

Apple, Roku and Google are already competing for your streaming business. And now Amazon enters the fray with its $99 Fire TV. But is it worth it? It’s a “Version 1” product, with scant few apps (or channels) out of the gate. How does it compare with The Big Three, namely Apple TV, Chromecast and Roku?

Is Amazon Fire TV better than Apple TV?
The Quad-core Qualcomm processor in the Fire TV gives it pure speed — fast menus, fast downloads and fast playback. Meanwhile, the Apple TV is getting long in the tooth with it’s mono-core A5 chip. The Amazon Prime and Cloud Drive services are well-integrated, as you would rightly expect, while the Apple TV works well with your iTunes, Macs, iPads and iPhones. Licensing and/or business strategy probably explains why HBOGo, Disney, MLB and PBS are missing on the Fire TV, and why Amazon Instant Video, Flixster and Pandora are missing on the Apple TV — and why Vudu and MGo are missing from both. With both of these units costing the same $99, the Fire TV is better in a context-free competition, but if you like your Apple environment, hold your cash for the 2014 version of Apple TV.

Is Amazon Fire TV better than Google Chromecast?
Google Chromecast still feels like an experiment in its early stages. The dongle idea has merit but Chromecast has four drawbacks: it’s a dongle that needs an external power source, it doesn’t come with a dedicated remote, its single-core processor is sluggish and it is missing some decent second-tier apps (Crackle, WatchESPN, NBA, Qello and Vimeo). Worse still, as with the Apple TV, Chromecast doesn’t support Amazon Instant Video. By contrast, Amazon’s Fire TV is a thin box, it comes with its own remote, it’s blazing fast and supports more channels. Chromecast does have HBOGo and integrated Google Play support, which are both unavailable on Fire TV, so it’s a viable option for HBO fanatics and Android phone / tablet users, but otherwise, Amazon’s Fire TV is the better choice, despite its size and price tag.

Is Amazon Fire TV better than Roku?
Roku 3 is the comparable box to the Fire TV at the same $99 price point. Both have a very good user interface, are responsive, support Ethernet as well as WiFi MIMO, and come with a remote control. Amazon is touting their voice search as a primary differentiator, so much so that their Gary Busey ad focuses entirely on that feature. But voice search only gives you results within the Amazon ecosystem, ignoring Netflix and HuluPlus entirely, even if you have paid subscriptions to those services. On the channel front, Roku blows all the other competitors out of the water with its 1000+ channels — more than any of us can watch, but enough that all our itches for weird niches get scratched (50-year-old westerns anyone?).  Roku puts up the best fight for the subscription-averse TV viewer by providing so many free entertainment options.

Summary
The Amazon Fire TV is fast and works great within the Amazon eco-system. It supports a reasonably decent experience for the casual couch gamer and has excellent voice recognition. If these are important to you, and you don’t intend to stray outside the Amazon Instant, Netflix and Hulu worlds, you’ll be happy with this unit. It’s selling like mad right now, so go load up. If, however, you want access to your iTunes content or want hundreds of channels, wait and give Apple, Roku or Google, whose units are more than a year old, a chance to play leap frog on the Fire TV this summer. The competition benefits all us consumers and Amazon just fired their first salvo — I’m quite glad to have four companies in the mix.

Do you own a box already? Will you get an Amazon Fire TV?

Copyright 2014 Lance Olive, All Rights Reserved.

Step 4: Get a Media Streaming Device

Standard
Step 4: Get a Media Streaming Device

Step 4: Get a Media Streaming Device

Have you been feeling like everyone else around you has figured out this “streaming movies and TV shows” thing, and you are standing on the fringes thinking you’ll eventually figure it out? But so far you haven’t really done anything about it.  So let’s get into some of the products that can help you.  Let’s figure out how to get you a media streaming device.

On February 17, I started a series for “cord cutters”, with a Blog entitled 6 Steps to Cutting the Cord of Cable.  In that, I presented a summary of what would need to be done in order to dump cable or satellite TV in favor of using a combination of Over The Air (OTA) for local stations and Streaming content from the Internet.  In yesterday’s blog, I elaborated on Step 3: Get an Optional Digital Video Recorder.

In today’s blog, I elaborate on Step 4: Get a Media Streaming Device.

You can get streaming services built into the TV, BluRay player or game system.  You can also buy a separate box such as a Roku or AppleTV, or a dongle in ChromeCast.

a) Built into the TV – additional $100
If you read Step 1 of this series, you considered a new TV.  Some are marketed as “Network Ready”.  This generally means you have a set of built-in applications that can get you Netflix, YouTube, hulu+, and perhaps a few other oddball services.  This is great if you only plan to use one or two of these and don’t want to stream through a home theater system.  Otherwise, you’ll want a separate device, and all of the following fit that category.

b) Built into a BluRay player or Game System – $100 to $400
Panasonic, LG, Samsung, Sony and other BluRay players have a Network feature that, when connected to an ethernet or WiFi local area network (LAN) in your home, will access the internet to using many of the apps listed above.  Game systems, such as Xbox and PlayStation 3 (and the new 4) have the same type of functionality.  The benefit of this method is that you will probably be using your BluRay/DVD player or game system anyway, and it’s one less connection to your home theater.  The down side of this is that a component failure kills off two of your functions at the same time.  It may also make upgrades harder to afford.

c) Roku 3 (CNet Review) – $50 to $100
This small black box provides access to the most streaming services of any device known.  The interface has also gotten very good reviews from new users, meaning it should not be too difficult to learn.  With up to 1080p, HDMI, WiFi, 100Mbps Ethernet and a simple remote, this unit will let you watch shows on demand.  The “3” model has the faster processor and will help alleviate frustration when loading apps and shows since many of the previous models were underpowered and most of us have a low tolerance for sluggish technology.

d) Apple TV (CNet Review) – $100
Mac users have known about Apple TV for years, and have continuously thought that the next generation will fix their issues.  But each time the next generation comes out, the product has only been improved marginally and Roku has moved ahead yet again.  It’s like the guy who coughs around the office for weeks but won’t take a couple of days off to actually get well.  Apple has never committed itself to a “get well” program that would make this product completely outstanding, which is really disappointing to people like myself who see the potential, already enjoying the iTunes, video and audio support that is there.  The silver bullet would be a source-neutral interface that lets you find, let’s call them, “viewables” that are in any of the services to which you have access through login credentials.  For example, imagine that you could search for “CSI: Miami” and you don’t have to know which service it came from.  That would be completely amazing, considering how many stream options there are out there.  Lastly, the included AirPlay functionality helps with integration to other devices that support it.

e) Google ChromeCast (CNet Review) – $35
The ChromeCast is a “dongle”, a small device with no cable that plugs into your HDMI slot.  Well, that’s not entirely true since it requires power, so you’ve got to connect a wire to the nearest USB slot, or to a AC converter.  ChromeCast is very good with Google products, such as Play music and video.  Android smart phone users will find this an attractive option for them.  iPhone users will likely gravitate to AppleTV (Mac users) or Roku (PC users).  The next generation ChromeCast will likely be a leap above this one and you would be forgiven if you decided to wait until then to buy one.  One thing is undeniable… they are small and discreet, able to be hidden in the plan of a 6-yr-old child.

I am getting Roku if I buy soon.  If Apple finally releases an update to the AppleTV that is worthy of considering, I’ll probably get that too.  I’m likely to pass on the ChromeCast, unless the next generation is amazing.

Which one is right for you?  It may depend upon your intended use (home theater or simple TV) and what you are currently doing with your smart phone (iPhone vs Android) and home computer (Mac vs PC).  Is it obvious to you by now?

Step 3: Get an Optional Digital Video Recorder

Standard
Step 3: Get an Optional Digital Video Recorder

Step 3: Get an Optional Digital Video Recorder

Did you feel like the master of time and space when you first recorded a show to watch it later? Or did you get a thrill the first time you set up your DVR to record some favorite series of re-runs, and then you turned on your DVR to find that the station had a marathon on your show and you wound up with 12 episodes waiting for you?

On February 17, I started a series for “cord cutters”, with a Blog entitled 6 Steps to Cutting the Cord of Cable.  In that, I presented a summary of what would need to be done in order to dump cable or satellite TV in favor of using a combination of Over The Air (OTA) for local stations and Streaming content from the Internet.  In yesterday’s blog, I elaborated on Step 2: Get an Antenna for Over The Air TV.

In today’s blog, I elaborate on Step 3: Get an Optional Digital Video Recorder.

Backtrack: We used to pop in a VHS tape and record shows on a VCR.  This practice was so prevalent that we began using the phrase “…can’t program the VCR…” to imply someone was technologically challenged.  Then came TiVo and it used a hard drive, rather than removable media.  It was such a rush to realize that you could “tivo” 100 shows onto the disk and recall any one you wanted.  It felt like a video jukebox!

The generic term for this device is a Digital Video Recorder (DVR).  A competing brand at the time was ReplayTV.  Meanwhile, the more geeky folks were putting tuner cards or USB tuners on their computer and using software to record shows.  Even as I type this, I have the Elgato EyeTV on my Mac here.  It works well for Standard Definition and it used to work well for High Definition until the cable company began encrypting them (I shake my digital fist at them).

So here we are today… the cable companies and the satellite companies all have an integrated tuner and DVR that they will gladly put in your house for a monthly fee so you can record more shows than you can ever watch.  We’ve got it made.

But, we’re here to cut the cord, so surely there are DVRs for over the air tuning, right?  Surprisingly, the market is somewhat limited.  So, I’ll touch on a few.  Those of you who are complete nerds on this topic will undoubtedly tell me that I didn’t include your favorite model or some home-brew set up.  My answer is that I’m looking at commodity products for general consumers, so let’s run down my list, in order of my personal preference.

° TabloTV (CNet Review)
Comes in 2-tuner and 4-tuner varieties.  Uses your iPad or Android tablet as the remote control.  Plays shows to your TV using a streaming media device (see Step 4 tomorrow).  It will also play to your handheld mobile device, even if you are away from home.  Yes, you can watch your DVR while you’re hanging out at the coffee shop.  Due to this design, you only really need one of these for your whole house, not one for each TV.  The electronic program guide (EPG) that tells you what shows come on when, is a nominal fee (not yet published).  The dual tuner model is $220 before you add your own hard drive.

° Channel Master DVR+ (CNet Review)
16 GB of flash memory to record a couple of shows, and a USB port to add your own external hard drive.  Shaped like a thin crust 11″ square pizza.  The DVR+ has an HDMI jack so you can connect directly to your TV and you don’t need a streaming content box.  To get the program guide, you’ll need to hook it up to ethernet or buy a WiFi dongle.  The free program guide is appealing to those who want to avoid recurring costs of any kind.  The device is $250 without the external hard drive.

° TiVo Roamio (CNet Review)
500 GB built-in memory will record 75 HD shows.  Hooks directly to your TV.  Absolutely the best remote control I’ve ever used in my life.  The box is not much bigger than a BluRay player and the user interface is very good, including streaming services.  It requires a pricey subscription for the guide content and has built-in WiFi so you can download the guide and stream shows. The base box is $200 and the lifetime subscription for the guide is $500.

The DVR is an optional part of being a cord cutter.  But if you’ve ever gotten used to a DVR with cable or satellite, I’m betting you’ll have withdrawals if you try to go without a DVR.  Live TV is maddening for me these days.

You can go without, but honestly, don’t.  Part of cutting the cord is to experience the elation of freedom.  Don’t be a slave to live TV.  Get a DVR and pay for the electronic program guide.

Step 2: Get an Antenna for Over The Air TV

Standard
Step 2: Get an Antenna for Over The Air TV

Step 2: Get an Antenna for Over The Air TV

In the 1970s, I used to tune in channels 5 and 11 with rabbit ears and channel 28 with a loop or bow tie that was clipped onto one of the ears.  In the 1980s, we got 35 cable channels using an old Zenith tuner that had red LED numbers on the front.  In the 1990s, we had about 60 channels and the TVs had the tuner built in.  In the 2000s, we got hundreds of channels and high definition came along.

On February 17, I started a series for “cord cutters”, with a Blog entitled 6 Steps to Cutting the Cord of Cable.  In that, I presented a summary of what would need to be done in order to dump cable or satellite TV in favor of using a combination of Over The Air (OTA) for local stations and Streaming content from the Internet.  In yesterday’s blog, I elaborated on Step 1: Start with a High Definition Television (HDTV).

In today’s blog, I elaborate on Step 2: Get an Antenna for Over The Air TV.

a) You will need a good UHF antenna to pick up digital stations. 

Those “rabbit ears” I spoke of earlier form what’s called a dipole antenna, which is tuned for channels 2 through 13, whose signals live in the space known as Very High Frequency (VHF) band.  The loop or bow tie is designed to pick up signals in the Ultra High Frequency (UHF) band.

Cord cutters need to understand how the digital age has taken over these frequencies.  From 2006 to 2009, broadcasters began transitioning their stations to HD content and digitally encoded transmissions.  Since digital protocol contains a new layer of channel abstraction, the digital transmission for a low channel number, e.g. 5, was set to be simulcast on a previously unused UHF channel, e.g. 54.  It then self-identified as 5.1 (or sometimes 5-1) to indicate that it was the primary (.1) channel in the family (5).  Similarly, 5.2 and 5.3 would represent two other channels in the 5 family.

Today, all of the analog broadcasting has been shut down (as of 2009).  Many never bothered to transfer back down in the VHF range.  So all of the digital stations are UHF and, thus, require a UHF antenna to pick up the stations.  There are exceptions, such as channel 11 in the Raleigh-Durham market, but that’s the only one in the area today.

Because UHF carries nearly all the digital content, a so-called “digital antenna” is nothing more than a UHF antenna.  That’s right, the technology for a digital antenna is old school.  This explains why they are all either bow ties, yagis (the parallel aluminum rods) or loops (keep in mind that often these shapes are hidden in a flat plastic sleeve in order to hide ugly wire).

b) Mount your antenna as high as you can.

In some cases, you may have to simply place the antenna on the table top or attach it to the wall.  But if you can run coaxial cable up to the attic or outside to a mast, you’ll get better reception.  Incidentally, if you’ve never experienced it… digital weak signals manifest themselves as blocky and jumpy pictures, or blackouts, rather than “snow”.  Satellite owners will recognize this as the same look as when a heavy rain is passing over their dish outside.

c) Aim your antenna towards your primary towers.

In the Raleigh, NC area, the big towers are east of Garner, just past the NC-70 and I-40 intersection.  You can find local towers by using antenna web. Once you figure out the compass direction, you can aim your antenna the same way by remembering that 0° is due North, 90° is due East, and so on.  Use a compass app in your smart phone to figure out the angle relative to your house.  Put down a piece of tape on the floor until you get a solid signal.

To aim a bow tie antenna, think about someone wearing it.  The front is the flat side, so “face” the tower.  Aiming a loop is the same — flat side faces the tower.  To aim a yogi antenna, the type depicted in my graphic at the top of this blog, it’s more like pointing your finger… point the skinniest part of the antenna at the tower.

d) Mount your antenna as high as you can.

Objects in the way can degrade the signal, so anything below 6′ high, furniture, humans, wires, etc. will affect the signal.  If it’s too difficult to run the cable out of the room, mount the antenna up the wall, near the ceiling or near a window.  If you can get up to the attic or outside on a mast, those a better.  Don’t worry about the weather for outdoor-rated antennas.  They are going to survive basic rain and snow and sun.

If you live in a fairly remote area, you should really think about a mast strapped to the chimney, mounted on a pole or bolted to the side of the house.  You need to go high so you can pick up signals that float above the tree line.

e) Get the right amount of gain in your antenna.

This may be the most technical part of this write-up.  Gain is the term used to describe the natural signal amplification that occurs when the radio frequencies that propagate over the air strike the metallic antenna and create a signal resonance that gets transmitted down the cable to the tuner or TV.

Gain is measured in decibels (dB).  Home-use antennas range from 3dB to 20dB.  The further you are from the big towers, the more gain you’ll need from your antenna.  You can also boost your antenna with an AC-powered amplifier.  My rule of thumb, figure out which antenna you think you will need and then get the next one up (more dB gain), because your instinct will be to get an antenna that is one size too small.  Trust me, it happens.

One word of caution, remember that marketing statements like, “Picks Up Signals Up To 50 Miles” are fraught with hype.  What they mean is, “In a perfect environment, such as across the flat plains of Nebraska, when the weather is perfect and your antenna is outside, on top of your house 47.9 miles away, we calculate, using antenna theory formulas, that you should get enough signal so you won’t have any problems, so we round off to 50 and use the phrase ‘up to’ so you can’t sue us for false advertising.”  Take their lowest number stated and divide it in half to be safe, since you have to account for real life obstacles between you and the transmitting tower.

f) Get the biggest antenna that you won’t completely hate because it’s so big.

I really believe the antenna is not the item you want to try and save $20 on.  Nothing ruins a good TV watching experience like blocks, chunks, freezes and blackouts.  Even though there is some looseness in the “bigger is better” rule here, generally speaking, the bigger antennas have more gain.  Antennas that cost under $30 are mostly worthless because you can make one just as good with supplies around the house.

If you are crafty and adventurous, you can make your own DIY antenna from aluminum foil, coat hanger, cardboard and tape.  There are several out there to try, but here is one example.  The bow tie (or cat’s whiskers) style seem to give the best results for minimal effort.  Doing it yourself can be a fun project, especially if you involve you child in the project.  Note that the numbers matter a lot, so if it says cut the wire to 18.125″, make sure you are as accurate as you can be.

Have fun with it.  Once you have the antenna, you can hook it directly to the TV and start auto-tuning your TV.  The excitement of getting free stations once again, just like “ye olden days”, should invigorate you to start counting the money that you’re no longer spending on cable or satellite subscriptions!

Step 1: Start with a High Definition Television (HDTV)

Standard
Start with a High Definition Television (HDTV)

Start with a High Definition Television (HDTV)

On February 17, I started a series for “cord cutters”, with a Blog entitled 6 Steps to Cutting the Cord of Cable.  In that, I presented a summary of what would need to be done in order to dump cable or satellite TV in favor of using a combination of Over The Air (OTA) for local stations and Streaming content from the Internet.

In today’s blog, I elaborate on Step 1: Start with a High Definition Television (HDTV).

It’s hard to believe that just 10 years ago, I updated my TV to a Sony WEGA model that had a flat display (it was still a CRT), 480p (progressive scan), and could handle a 16:9 aspect ratio by putting black bars at the top and bottom. I was able to get very nice pictures with a progressive scan DVD player and later with a digital tuner box if connected into the component (RGB) jacks.

Today, LCD, plasma and LED screens are common.  They provide flat screen viewing, high definition resolution at 720p and 1080p with HDMI inputs.  The network-enabled versions can handle streaming content right there in the TV, without the need for an external box (to be covered in Step 4).  With sizes ranging from 20″ to 72″ diagonal screen measurement, they cover the whole range of table top and wall-mounted options.

While you can certainly make this whole setup work with 480 lines of resolution on a 4:3 standard definition TV, I don’t recommend it.  You’ll be missing out on the joy of crisp images and modern connectivity.  Some may tell you that you need to have 1080 lines, but my experience is that 720 is fine up to 45″ diagonal.

Then there are the technology options… should you get LCD, Plasma or LED?  These represent different methods of making the color picture elements (pixels) on the screen.  I’ve never been so techno-elitest that I can’t be happy with LCD, which has been around the longest and can be more affordable in the smaller sizes.  Plasma tends to have brighter colors and blacker blacks, and may be the best value today.  LED is the newest and usually costs more, but I’m not convinced the price differential is worth it.  The best advice I can give you here is to not spend as much time worrying about this as many people do.  In the end, you’ll care more about things like viewing angle, i.e. how far to the side can you still see the picture clearly?

If you are buying new, it’s worth considering getting an Internet-ready TV that can stream Netflix and other services directly into your TV.  I don’t own any of these, but it does cut down on the number of boxes and remote controls and that’s good for my parents, who have learned to use Netflix on their TV.  Sometimes simplicity rules.

In the end, you should expect to spend anywhere from $200 to $2000 on a TV.  You can overpay for a brand (Sony, Samsung), or go cheap on an off-brand (Insignia, Sceptre) that you might dislike once you begin to use it.  Middle of the road brands (Panasonic, LG, Vizio) are generally good safe value brands.  Just check the buyer comments and ratings before choosing a model.

For the record, I have two Samsung TVs, which I bought on sale in 2007, mounted on the walls and have never had a problem with either of them.  I also have an Optoma HD20 projector in the bonus room, now The Movie Room, which is mounted upside down on the ceiling.  I built a screen for the wall and installed a home theater sound system.  Pictures are up in my Facebook photo album for those of you who have access to my photo albums.

My plan is to use the existing TVs that I own now — I won’t be buying any new TVs.  But you might have to, so do a little homework and let me know if you have any questions.

For more on TV Dimensions, click here.

6 Steps to Cutting the Cord of Cable

Standard
A Modern Home Network Can Enable Streaming Content Without Paying Monthly Cable or Satellite TV Bills

A Modern Home Network Can Enable Streaming Content Without Paying Monthly Cable or Satellite TV Bills

In these days of on-demand streaming services and high-speed Internet access, do you wonder why you pay so much for hundreds of channels that you don’t watch?  Do you wonder why you can’t just choose a la carte the channels you watch most?

I did.  So I began the quest of planning out what it would take to make the big switch and “cut the cord.”  I’m starting from having Time Warner’s Signature Service, which includes Ultra Broadband Internet (50/5 Mbps), Unlimited VoIP Telephone within the Continental U.S., and HD TV with 2 DVRs that can share shows.

Your process will vary depending on your starting point and where you want to end up, but here are the steps that will approximate a replacement to cable TV.  Over the next several days, I’ll elaborate on each of these steps, but for now, I’ll stick to a single paragraph and you can use this as a summary.

1) Start with a High Definition Television (HDTV)
Most new TVs have a built-in digital tuner and HDMI input.  Let’s call this step “table stakes”.  If you’ve never replaced your old “glass” TV, stop reading now and go get yourself something like this Vizio from Walmart for under $200.  You can spend up to $2000 on a TV, but this post will be much better if we assume this is in place before we go any further.

2) Get an Antenna for Over The Air TV – $20 to $100
There are lots of options for digital antennas, and more than half of them are mediocre at best. My favorite style antennas are the multiple bow tie that can be used for 95% of the HD stations.  There are others that can work and I’ll go into details in a future post.

3) Get an Optional Digital Video Recorder – $200 to $400 plus guide service fees
TiVo was the first big dog to this party, to the point that, back in 2003, the word “tivo” was being used a verb, meaning “to record television show on a hard drive in digital form for later viewing.”  There are newcomers to this market now that have reinvented this market and are worth considering.  This will also be part of a future post.

4) Get a Media Streaming Device – $35 to $200
There are three primary competitors for this, Apple TV, Roku and ChromeCast, although there are lots of options.  They help put your content on your TV.  Many BluRay players and game systems come with network apps that provide interfaces to many content providers, which leads to the last two steps…

5) Get a WiFi N Router – $40 to $60
Many of us have had G-speed routers (802.11g), which supports 54Mbps shared bandwidth, but if you want to have multiple wireless streaming devices in your home network, it’s really better to be running at N-speed (802.11n).  Doing so will ensure you minimize any video streaming jitter and buffering.  Of course, you can avoid this need if you run Cat5 ethernet cables to your devices, but many devices today are WiFi only.

6) Create Logins and Subscribe to Streaming Services – $10 to $50 per month
Streaming services give you content on demand, which means you can start it, pause it and finish it anytime that is convenient to you.  The easiest way to introduce this topic is by example, so here are some that you probably have heard of: Netflix, Hulu+, Amazon Prime and vudu.  There are many others, specializing in niche content, such as Mexican soccer, NBA, old westerns, YouTube videos and independent films.  Some are free, some require subscriptions that are usually less than $10/month.

Those are the five steps that you need to evaluate in order to cut yourself loose from Time Warner Cable TV, DirecTV, Dish Network or AT&T Uverse and replace them with Internet-based content.  In each of five future posts, I will dedicate to the above five steps.

Take your time to plan your attack.  Read my future posts for ideas on the steps and map out your transition along with me.